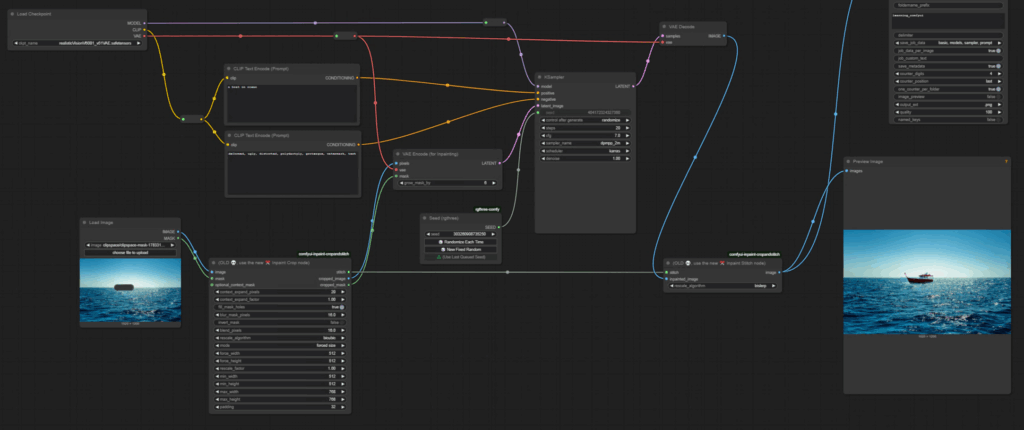
Inpainting resolution optimization plays a crucial role in enhancing the quality of generated images, especially when working with models in tools like ComfyUI. The process involves scaling the masked area to leverage the full training resolution, generating the image at higher precision, and then compositing it back with the original background. This article will walk you through the steps to optimize inpainting resolution using the Inpaint-CropAndStitch node in ComfyUI.
More details about the node can be found from lquesada/ComfyUI-Inpaint-CropAndStitch: ComfyUI nodes to crop before sampling and stitch back after sampling that speed up inpainting.

Why Optimize Inpainting Resolution?
The default inpainting workflow often produces suboptimal results, particularly in areas like facial features or intricate textures. This occurs because only a small portion of the model’s training resolution is used for generation. By scaling the masked area to utilize the full resolution, you can significantly improve the quality of the inpainted image.
Step-by-Step Guide to Optimizing Inpainting Resolution
1. Install the Inpaint-CropAndStitch Node
To simplify the process, ComfyUI offers a custom node called Inpaint-CropAndStitch. Follow these steps:
- Open the ComfyUI Manager.
- Search for “ComfyUI-Inpaint-CropAndStitch.”
- Install the node and restart ComfyUI.
2. Set Up the Inpaint Crop Node
The Inpaint Crop node scales the masked area to match the model’s training resolution. Here’s how to configure it:
- Create the Inpaint Crop node by double-clicking and typing “I-N-P-A-I.”
- Place the node between the Load Image node and the VAE Encode for Inpainting node.
- Connect the image input and mask input to the respective outputs from the previous workflow.
- Set the resolution mode to Forced Size for precise control. For example:
- If the masked area is square, use 512×512 pixels.
- For non-square masks, calculate the resolution based on the aspect ratio using a resolution selector node.
3. Set Up the Inpaint Stitch Node
The Inpaint Stitch node composites the generated image back into the original background. Configure it as follows:
- Create the Inpaint Stitch node by double-clicking and typing “I-N-P-A-I.”
- Place the node between the VAE Decode node and the Image Output node.
- Connect the image output from the VAE Decode node to the inpainted image input of the Inpaint Stitch node.
- Link the stitch output from the Inpaint Crop node to the stitch input of the Inpaint Stitch node.
Fine-Tuning the Workflow
Adjust Resolution for Better Results
Experiment with resolution settings to match the aspect ratio of your masked area. Higher resolutions often yield better results but may introduce texture mismatches between the inpainted region and the original image.
Randomize Seeds for Improved Output
If the generated image is unsatisfactory, randomize the seed until you achieve an acceptable result. In cases where specific areas (e.g., eyes or facial features) still look problematic, perform additional passes of inpainting focused on those regions.
Address Border Discontinuities
Using Inpaint Crop and Stitch improves the masked area’s generation quality but may lead to visible border discontinuities. To resolve this, consider masking the object (e.g., the cat) and compositing it with the original background using external tools or additional workflows.
Challenges and Trade-Offs
While optimizing inpainting resolution improves the quality within the mask, it may introduce mismatches in texture or patterns compared to the original image. These trade-offs are common when generating content at higher resolutions and can be mitigated through careful masking and compositing techniques.
Conclusion
Optimizing inpainting resolution using the Inpaint-CropAndStitch node in ComfyUI is an effective way to enhance the quality of generated images. By scaling the masked area to the full training resolution and compositing it back with the original background, you can achieve better results in complex workflows. While challenges like border discontinuities may arise, these can be addressed with additional passes or external tools.
3 thoughts on “C26: How to Optimize Inpainting Resolution in ComfyUI for Better Image Quality”