Inpainting is a critical technique in AI-driven art generation, especially when precise compositions, multiple subjects, or complex designs are required. Inpainting with specialized models allows creators to overcome the limitations of text prompts, which can often lead to unintended or ignored outputs when exceeding 30 tokens. This article explores the inpainting process, focusing on Stable Diffusion models, and provides actionable insights to enhance your workflow.
Table of Contents
What Is Inpainting and Why Is It Important?
Inpainting involves modifying specific areas of an existing image while preserving the surrounding content. This technique is invaluable when a prompt alone cannot achieve the desired results, as it allows for breaking down the generation process into manageable steps.
For instance, you can create a background image first and then use inpainting to insert a foreground subject, such as a character or object. This layered approach ensures greater control over the composition and avoids the pitfalls of overloading the text encoder.
The Role of Specialized Inpainting Models
Specialized inpainting models are trained specifically for this purpose, offering superior results compared to general models. For example, if you’ve used the Realistic Vision 5.1 model to generate your background, pairing it with the corresponding Realistic Vision 5.1 inpainting model will yield the best results. These models are typically available on platforms like Civitai.
Key Setup for Inpainting Models:
- Model Installation: Ensure the inpainting model is placed in the correct folder. For ComfyUI, this means placing it in the
models/Checkpointfolder rather than themodels/Inpaintingfolder. - Resolution Compatibility: Use images with resolutions that match the model’s native dimensions (e.g., 512×512 for Realistic Vision 5.1). Mismatched resolutions can lead to distorted results.
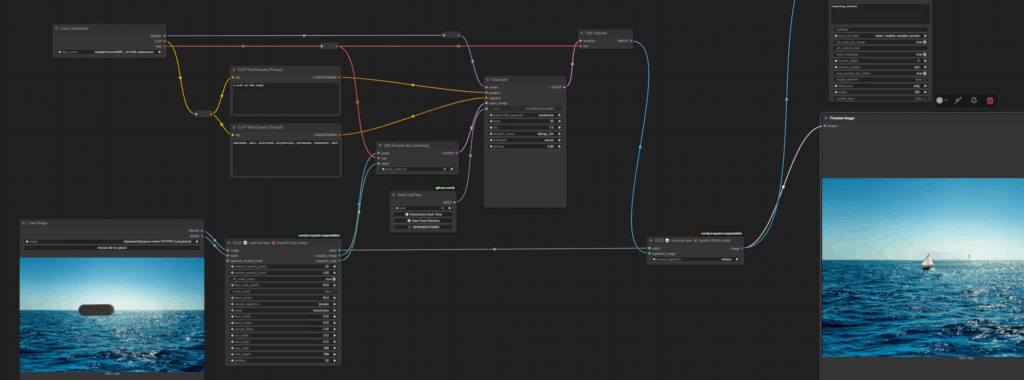
Step-by-Step Inpainting Workflow in ComfyUI
1. Load the Inpainting Model
- Open ComfyUI and load the inpainting model into the Load Checkpoint node.
- Verify that the model includes the VAE (Variational Autoencoder) for optimal performance.
2. Prepare Your Base Image
- Use a Load Image node to upload your prepared background image.
- Ensure the image resolution aligns with the model’s optimal settings.
3. Set Up the VAE Encode for Inpainting
- Add a VAE Encode for Inpainting node to your workflow. This node connects the latent image to the KSampler and accepts three inputs:
- VAE: Connect this from the Checkpoint node.
- Pixels: Connect this from the Load Image node.
- Mask: Connect this from the Load Image node to indicate the area you want to modify.
4. Create and Edit the Mask
- Right-click on the Load Image node and select Open in Mask Editor.

- Use the circular brush to draw the area where inpainting will occur. Adjust the brush size with the
[ ]keys. - Save the mask to the node once completed.
Pro Tip: The mask’s shape is a general indicator of where the new subject will be placed. It does not define the exact contours of the subject.
5. Define Your Prompt
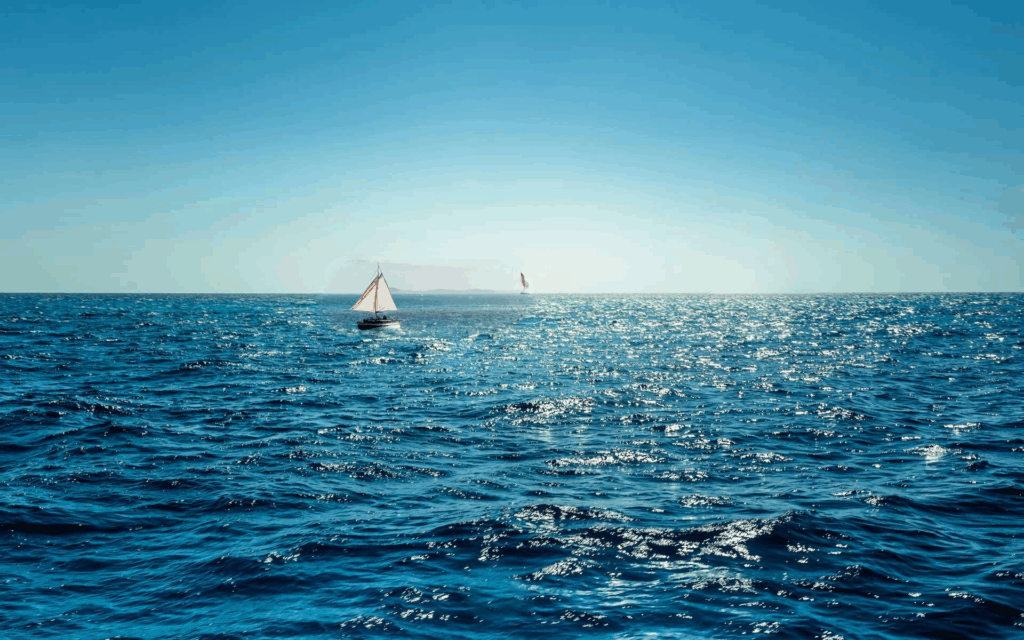
- Write a clear and concise prompt, such as:
“A boat on the ocean.” - Use a negative prompt to exclude unwanted elements, e.g., “ugly, deformed, grotesque.”
6. Generate and Refine
- Queue the workflow and review the output. If the result is unsatisfactory:
- Adjust the mask size or shape.
- Re-randomize the seed.
- Experiment with different prompts or parameters.
Note: Smaller mask areas can lead to distorted results because they utilize a limited portion of the model’s latent space. For better outcomes, try enlarging the mask or increasing the resolution.
The whole workflow
Original image:

Inpainting:
Troubleshooting Common Issues
- Blurry or Distorted Outputs:
- Ensure the image resolution matches the model’s specifications.
- Use a larger mask area to reduce distortions.
- Unrealistic or Unnatural Results:
- Re-randomize the seed and refine the mask.
- Use a specialized inpainting model compatible with your base model.
- Model Limitations:
- If the inpainting model struggles with small details, consider breaking the task into smaller steps or using higher-resolution images.
Additional Resources
Conclusion
Inpainting with specialized models like Realistic Vision 5.1 offers unparalleled control over AI-generated compositions. By following the steps outlined above, you can achieve precise and visually appealing results. Remember to experiment with masks, prompts, and seeds to refine your workflow further.