Automatic updates are essential for maintaining the security and performance of your Windows virtual machines (VMs). However, improperly configured updates can lead to unexpected reboots, which can disrupt operations. In this guide, we’ll explore how to configure automatic updates for Windows VMs, understand why updates are applied unexpectedly, and provide mitigation strategies to meet your specific requirements.
Table of Contents
Why Automatic Updates Can Cause Issues
Automatic updates are often enabled by default when deploying Windows VMs, leading to scenarios where:
- VMs restart unexpectedly after updates are applied.
- Local policy settings or registry configurations override platform-level settings.
- Update management tools fail to prevent reboots due to policy conflicts.
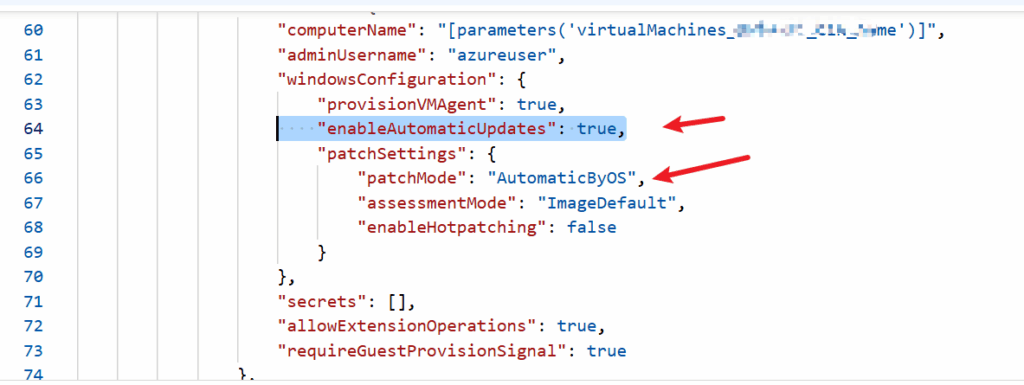
The root cause of automatic updates lies in the enableAutomaticUpdates key in the Azure Resource Manager (ARM) template. By default, this key is set to True, which allows updates to download and install automatically.
NOTE: Switching from AutomaticByOS to Manual is not supported, please refer to public article: https://learn.microsoft.com/en-us/azure/virtual-machines/automatic-vm-guest-patching#disable-automatic-vm-guest-patching
Key Considerations
- Unexpected Restarts: Even with tools like Update Management Services configured to “Never Reboot,” local policies may take precedence, causing reboots.
- Policy Priority: Local Group Policy settings or registry configurations override platform-level update settings.
For more details on Azure’s automatic VM guest patching, refer to the official Microsoft documentation.
How to Configure Automatic Updates
There are two primary methods to configure and control automatic updates on Windows VMs:
- Using Group Policy Settings
- Editing Registry Settings (not recommended unless necessary)
Method 1: Configure Group Policy Settings
Using Group Policy is the recommended approach to manage Windows Updates. Follow these steps to configure update policies:
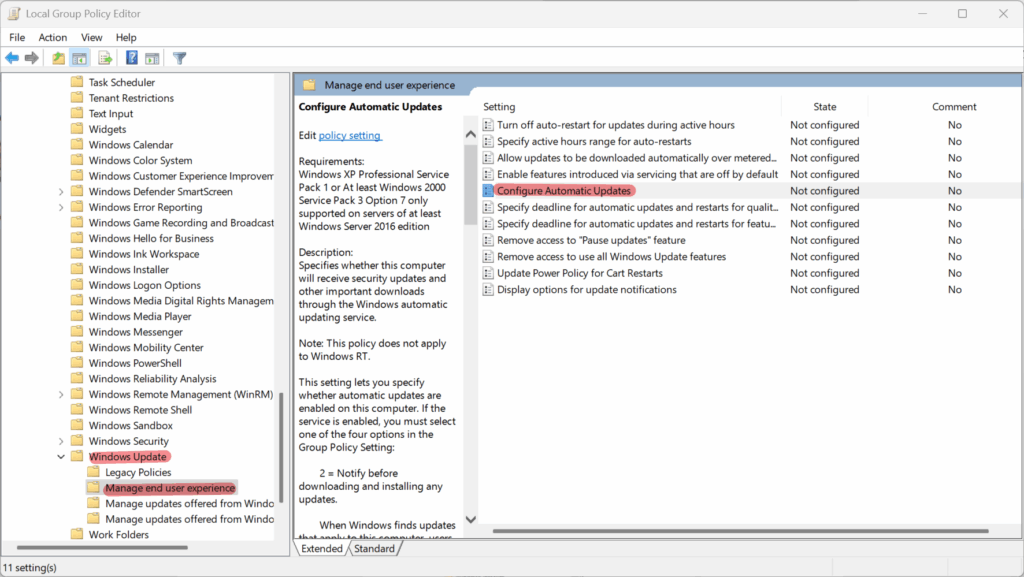
Step 1: Open Group Policy Editor
- Press
Win + R, typegpedit.msc, and press Enter. - Navigate to the following path:
Computer Configuration > Administrative Templates > Windows Components > Windows Update
Step 2: Configure the “Automatic Updates” Policy
- Locate the Configure Automatic Updates policy.
- Double-click the policy to edit it. You’ll see three options:
- Not Configured (default)
- Enabled
- Disabled
- Select Enabled to configure automatic updates.
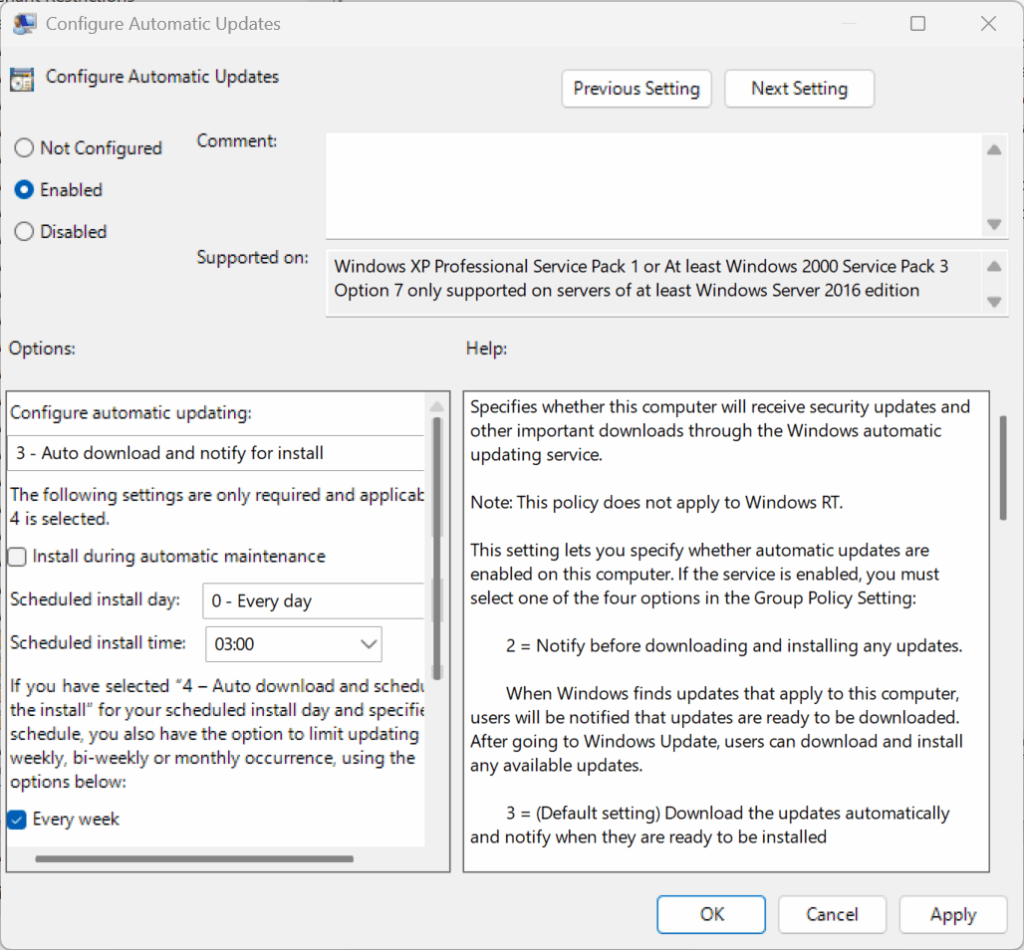
Step 3: Choose an Update Option
When enabling the policy, you’ll have the following configuration options:
- 2: Notify before downloading and installing updates.
- 3: Download updates automatically and notify for installation.
- 4: Automatically download updates and install them on a schedule.
- 5: Allow local administrators to select the configuration mode.
- 7: Notify for install and notify for restart.
Step 4: Additional Policies to Consider
Explore and configure other policies as needed:
- Allow Automatic Updates Immediate Installation
- No Auto-Restart with Logged-On Users for Scheduled Automatic Updates
(Note: This requires a user to be logged in to prevent restarts.)

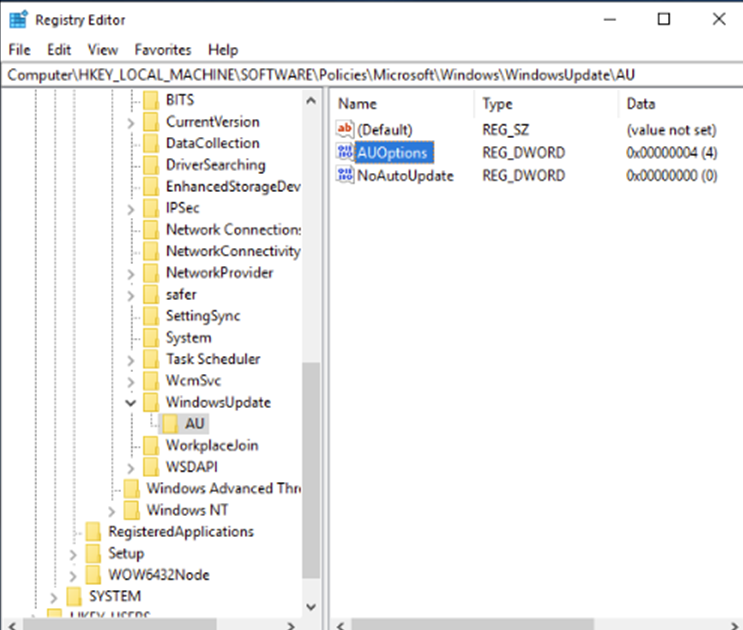
Step 5: Verify Changes in the Registry
Group Policy settings update the registry at the following path:
Computer\HKEY_LOCAL_MACHINE\SOFTWARE\Policies\Microsoft\Windows\WindowsUpdate
or
Computer\HKEY_LOCAL_MACHINE\SOFTWARE\Policies\Microsoft\Windows\WindowsUpdate\AU
Method 2: Edit Registry Settings
Disclaimer: Directly editing the registry is not recommended unless Group Policy cannot be used. Always take necessary vm backup/ os disk snapshot before proceeding.
Step 1: Open Registry Editor
- Press
Win + R, typeregedit, and press Enter. - Navigate to the following path: Computer\HKEY_LOCAL_MACHINE\SOFTWARE\Policies\Microsoft\Windows\WindowsUpdate or Computer\HKEY_LOCAL_MACHINE\SOFTWARE\Policies\Microsoft\Windows\WindowsUpdate\AU
Step 2: Modify the AUOptions Value
Set the AUOptions value based on your requirements:
- 2: Notify for download and auto install
- 3: Auto download and notify for install
- 4: Auto download and schedule the install
- 5: Allow local admin to choose settings
- 7: Auto download, notify to install, notify to restart
Step 3: Verify Changes
After updating the registry, confirm that the changes align with your desired configuration.
Mitigation Strategies
To avoid unexpected reboots and ensure updates are applied according to your needs, implement one of the following mitigations:
- Configure Group Policy Settings: The safest and most reliable method to control updates.
- Edit Registry Settings: Use only as a last resort when Group Policy is not an option.
Useful Resources
For additional information on managing Windows updates, refer to the following resources:
- Windows Update Management Service
- Handling Restarts of VMs due to Windows Updates
- Configuring Group Policy Settings for Windows Updates
Conclusion
By properly configuring automatic updates using Group Policy or registry settings, you can prevent unexpected reboots and maintain control over how updates are applied to your Windows VMs. Always prioritize using Group Policy for safer and more manageable configurations.