Introduction
Previously I introduce the way to create ec2 instance on AWS https://www.sysosx.com/blogs/create-your-first-ec2-instance-on-aws/. Below is one of the use case to setup your own VPN/V2Ray server via this instance.
Setting up a V2Ray server can be a daunting task, especially for beginners. However, with the help of a customized all-in-one script, you can deploy a secure V2Ray/VPN server quickly and at the lowest cost possible. This guide walks you through the process using the powerful script available on GitHub. Whether you’re looking to bypass censorship, enhance privacy, or securely access restricted content, this solution is designed to simplify the setup process.
Prerequisites
Before starting, ensure you meet the following requirements:
- Cloud Virtual Machine (VM):
- You need access to a cloud VM to host the V2Ray server.
- Tip: You can use the AWS Free Tier, which provides a free virtual machine for 12 months, making it an ideal choice for this setup. Other cloud providers like Google Cloud and Azure also offer free trial options.
- Domain Name:
- A domain name is required for the server setup. Ensure your domain has proper DNS records (A/AAAA pointing to your VM’s public IP).
- You can purchase a domain from providers like Namecheap, GoDaddy, or other registrars.
- Basic Linux Knowledge:
- Familiarity with SSH and Linux commands is helpful, but this guide simplifies the process for beginners.
Why Use the Customized All-in-One Script?
The script from GitHub is designed to:
- Automate the entire installation process: From installing dependencies to configuring V2Ray, Nginx, and SSL certificates.
- Minimize setup time: Deploy a fully functional V2Ray server in minutes.
- Provide flexibility: Supports TLS encryption, WebSocket transport, and camouflage websites for enhanced privacy and security.
Steps to Install the V2Ray Server
1. Prepare Your Cloud VM
- Launch a virtual machine on AWS Free Tier or any cloud provider.
- Use Ubuntu 24.04 or a compatible Linux distribution with X86 Architecture.
- Please set the security group to always allow inbound via 443. And temporarily allow 0.0.0.0/0 for inbound traffic during the installation, you can remove later after setup the ssl.
- Connect to the VM via SSH (e.g., using
ssh -i <key.pem> ubuntu@<public-IP>). And update the system via command line:
apt install & apt upgrade -y
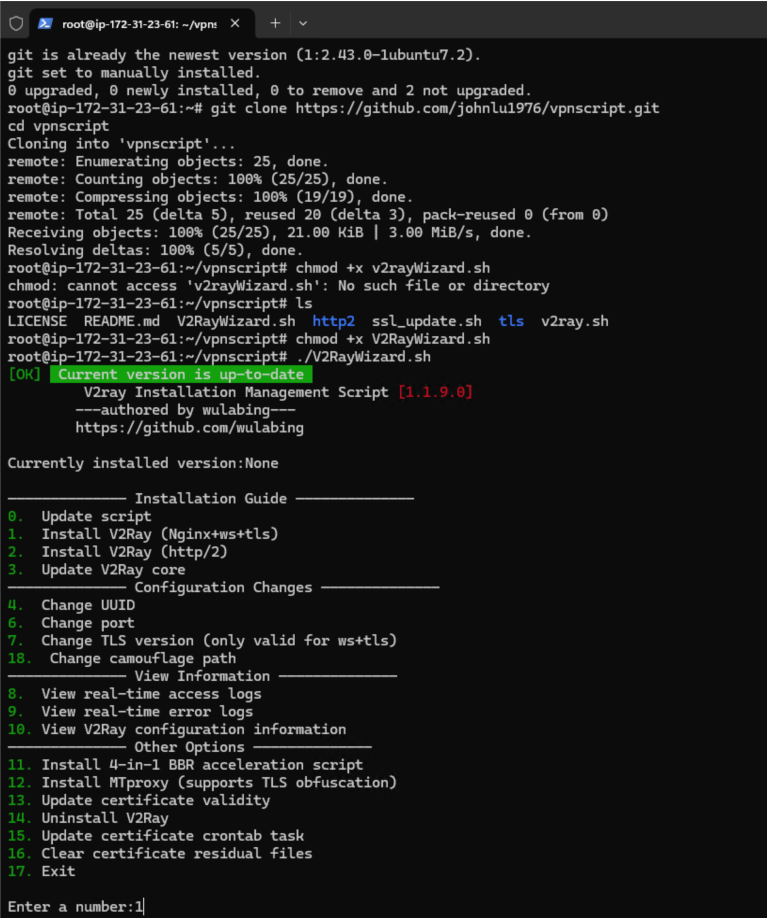
2. Download the Script
- Clone the installation script from GitHub:
git clone https://github.com/johnlu1976/vpnscript
cd vpnscript
chmod +x V2RayWizard.sh
3. Run the Script
- Execute the script to start the installation:
./V2RayWizard.sh
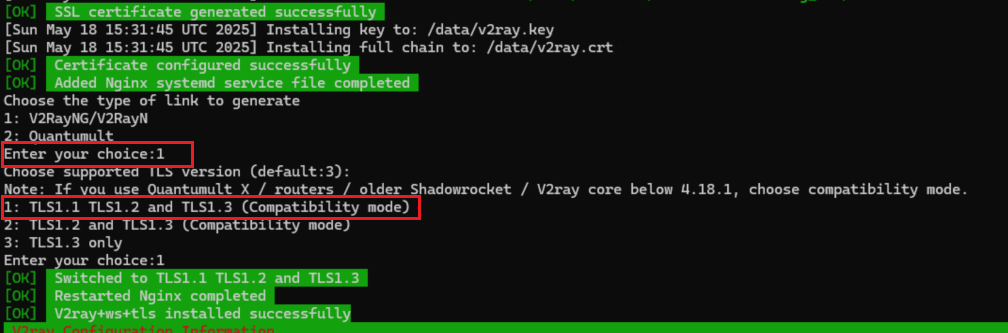
- Follow the interactive prompts:
- Choose option
1to install V2Ray withNginx+ws+tls. - Enter your domain name (e.g.,
example.com). - Ensure DNS records (A/AAAA) are correctly configured to point to your VM’s public IP.
- Choose option
4. Install Dependencies automatically
The script automatically installs necessary packages, including:
wget,git,unzip,qrencode,curl,build-essential, and others.- You need to specify the domain name and port number you are using, 443 is suggested.

5. Generate SSL Certificates automatically
- The script uses acme.sh to generate free Let’s Encrypt SSL certificates.
- Certificates are automatically configured for V2Ray and Nginx.
6. Configure V2Ray automatically
The script sets up V2Ray with the following parameters:
- UUID: A unique identifier for your user.
- Transport Protocol: WebSocket (
ws). - Security: TLS encryption.
- Path: A custom camouflage path (e.g.,
/randompath/).
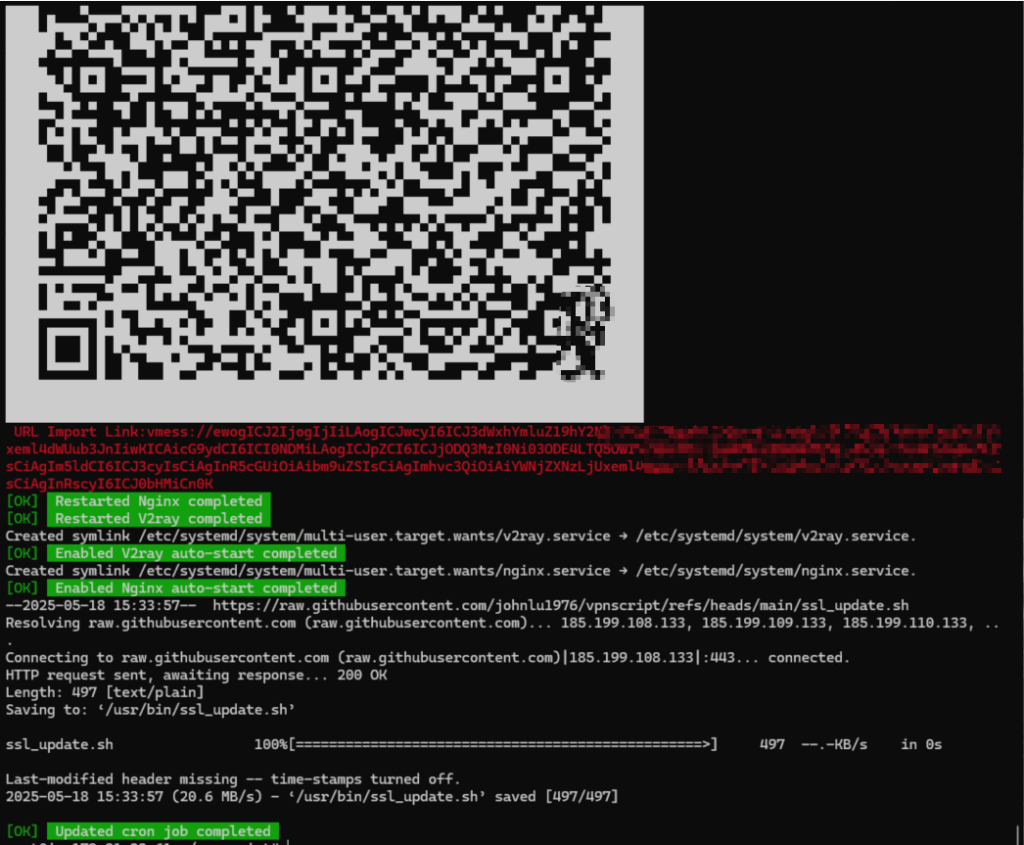
7. Start Services automatically
- Enable and start V2Ray and Nginx:
systemctl enable v2ray
systemctl start v2ray
systemctl enable nginx
systemctl start nginx
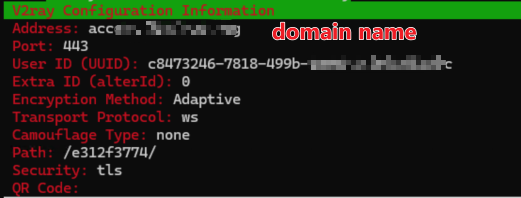
8. Generate Connection Information
The script provides:
- Connection details (e.g., domain, port, UUID, transport protocol).
- QR code for easy client configuration.
- URL import link for quick setup on supported clients.
Steps to Configure the Client Side
Client Applications
Install the appropriate client application for your device:
- Windows: V2RayN
- Mac: V2RayX
- Linux: Qv2ray
- Android: V2RayNG
- iPhone/iOS: Shadowrocket (paid) or Quantumult X (paid).
Client Configuration Steps
- Install the Client:
- Download and install the appropriate client for your device.
- Import Server Configuration:
- Use the QR code or URL import link generated by the script to configure the client automatically.
- Alternatively, manually enter the connection details:
- Address:
example.com - Port:
443 - UUID: Provided by the script (e.g.,
c8473246-7818-499b-aae4-e47e0e06e20c). - Transport Protocol: WebSocket (
ws). - Security: TLS.
- Path:
/randompath/.
- Address:
- Enable TLS:
- Ensure TLS is enabled for secure communication.
- Connect:
- Save the configuration and start the connection.
Benefits of Using This Script
- Ease of Use: No need to manually configure complex settings; the script handles everything.
- Cost Efficiency: Take advantage of free-tier cloud VMs and free SSL certificates.
- Customizable: Supports advanced features like camouflage paths and TLS encryption.
- Cross-Platform: Compatible with clients for Windows, Mac, Linux, Android, and iOS.
Troubleshooting Tips
- DNS Configuration: Verify your domain’s A/AAAA records point to your VM’s public IP.
- Firewall: Ensure ports
443and80are open on the server. - Logs: Use V2Ray logs (
journalctl -u v2ray) to debug connectivity issues.
Nice share!