Introduction
OpenPose, a widely-used protocol for defining human figure poses, provides a standardized method to represent humanoid joints and connections using images. This article explores how to leverage OpenPose within ComfyUI for creating text-to-image workflows. By combining OpenPose ControlNet models and pose images generated externally, users can define precise humanoid poses for AI image generation.
This guide will walk you through setting up OpenPose in ComfyUI, configuring the necessary components, and troubleshooting common issues, including problems with the OpenPose Editor node in the latest desktop version.
Table of Contents
Setting Up OpenPose in ComfyUI
Step 1: Download the Required Components
To use OpenPose in ComfyUI, you need two critical components:
- OpenPose ControlNet Model: This model is tailored for the specific diffusion model you’re using. For SDXL users, download the
controlnet-openpose-sdxl-1.0from Hugging Face. Locate the required file under the “Files and Versions” tab and place it in your ComfyUI installation directory underModels > ControlNet. - OpenPose Editor Node: Download and install the
ComfyUI-OpenPose-Editornode. Use the ComfyUI manager to search for and install this component. Restart ComfyUI after installation. - Pose Image Generation Service (Optional): If you’re facing issues with the OpenPose Editor node in the latest desktop version of ComfyUI, you can use an online OpenPose image generation service Openpose Editor to create pose images. Then download the pose image and load post image into ComfyUI using the
Load Imagenode.
Step 2: Build Your Workflow in ComfyUI
Workflow Setup
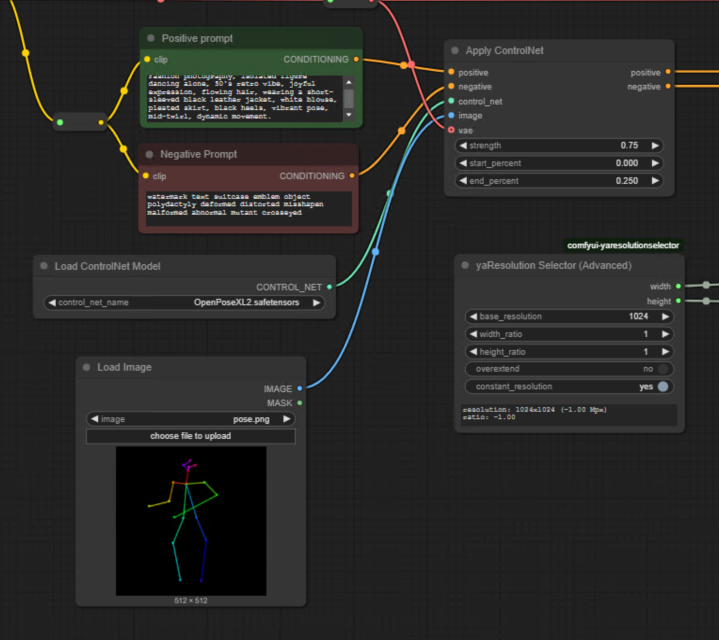
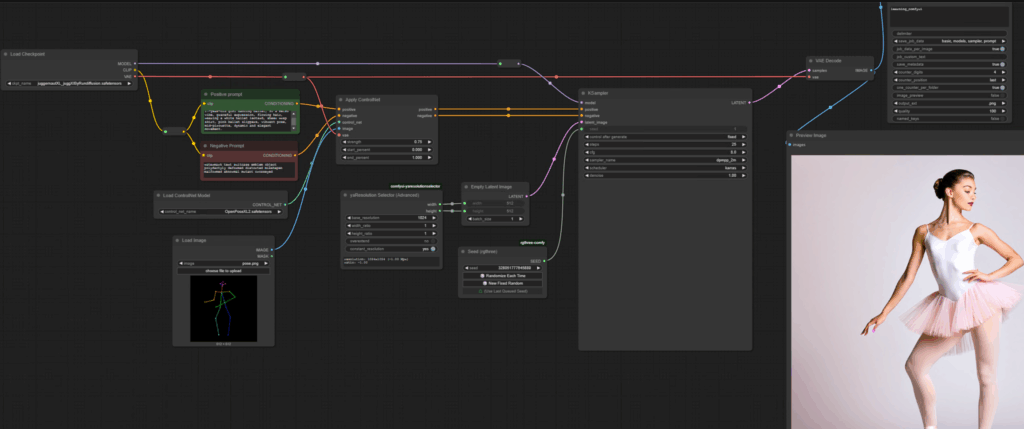
- Load ControlNet Model: Add the
Load ControlNet Modelnode to your workflow and load theOpenPoseXL2ControlNet model. Connect it to theApply ControlNetnode, which provides conditioning for the Sampler node. - Load Pose Image: Instead of using the OpenPose Editor node, add a
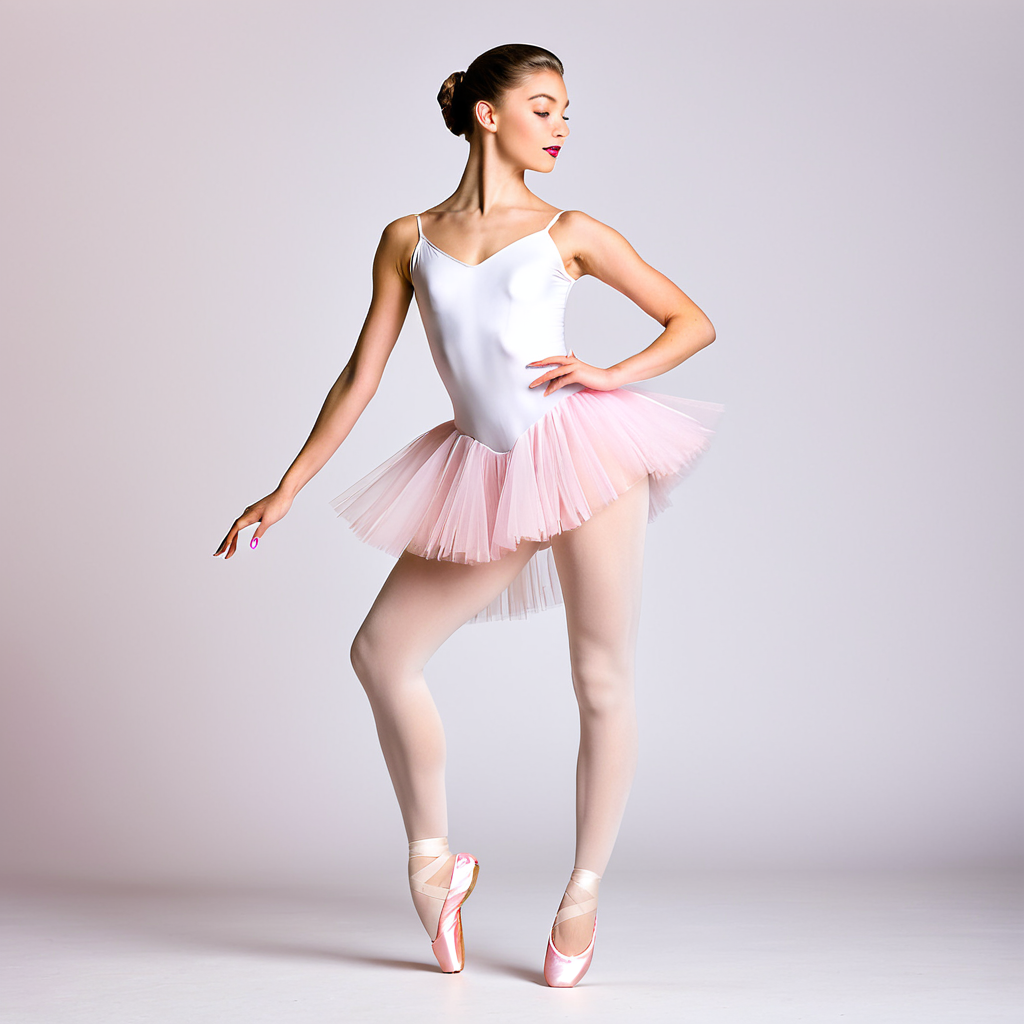
Load Imagenode to your workflow. Use this node to import the externally generated pose image. Connect the image output of theLoad Imagenode to the image input of theApply ControlNetnode. - Prompt: Fashion photography, isolated figure of a 17-year-old girl dancing ballet, 50’s retro vibe, graceful expression, flowing hair, wearing a white ballet leotard, sheer wrap skirt, pink ballet slippers, vibrant pose, mid-pirouette, dynamic and elegant movement.
Step 3: Generating Pose Images Externally
Why Use External Services?
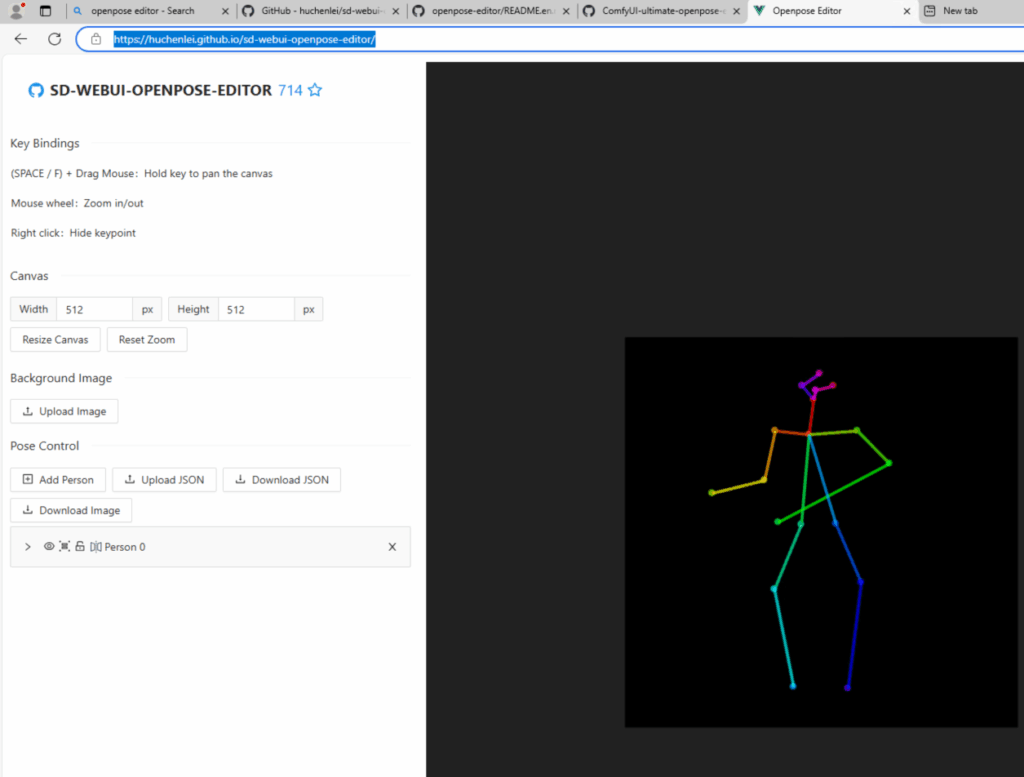
The OpenPose Editor node in the latest desktop version of ComfyUI has known issues, including limited functionality and display problems. To bypass these issues:
- Use an online OpenPose image generation service Openpose Editor to create pose images interactively. These services allow you to define humanoid poses without relying on the faulty editor.
Steps to Generate Pose Images Online
- Visit an online OpenPose image generation platform.
- Create and customize your pose interactively.
- Download the generated image in PNG format.
- Import the image into ComfyUI using the
Load Imagenode.
Step 4: Optimizing Workflow Parameters
Adjust ControlNet Application
To improve performance:
- Lower the
end_percentparameter in theApply ControlNetnode to 0.25. This ensures the ControlNet is applied only during the first 25% of the generation steps, speeding up the process while maintaining accuracy.
Queue the Workflow
After setting all parameters, queue the workflow and generate your image.
Troubleshooting Common Issues
Issue 1: OpenPose Editor Node Problems
- Problem: The OpenPose Editor node in the latest desktop version of ComfyUI has display and functionality issues. It’s still not fixed after I tried all the possible solutions from internet searching.
- Workaround: Use an online OpenPose image generation service Openpose Editor to create pose images and import them into ComfyUI using the
Load Imagenode.
Issue 2: Canvas Visibility in OpenPose Editor
- Problem: The editor window may not display properly in the browser-based version of ComfyUI.
- Solution: Zoom out using
Ctrl + Mouse Wheelin your browser to reveal hidden controls.
Issue 3: Facial Orientation and Expression
- Problem: Poses with specific facial orientations may not render as desired.
- Solution: Use inpainting techniques or re-roll with a different random seed to refine facial details.
Workflow:
Conclusion
By integrating OpenPose within ComfyUI, users can create detailed humanoid poses for AI image generation workflows. While the OpenPose Editor node in the latest desktop version has known issues, using external services to generate pose images offers a reliable alternative. Importing these images via the Load Image node ensures seamless workflow execution.
For advanced refinements, techniques like inpainting can further enhance outputs. For more information, refer to the official documentation on Hugging Face and the ComfyUI GitHub repository.
1 thought on “C24: How to Use OpenPose in ComfyUI for Humanoid Pose Creation in AI Workflows”